Complete Guide to the Seitron FREETIME+ Thermostat: Installation, Configuration, and Troubleshooting
The Seitron FREETIME+ Thermostat is a daily electronic thermostat with a large backlit display for viewing the detected room temperature or, optionally, the current time.
The room temperature regulation in Heating mode occurs at two levels: Comfort and Reduction. Additionally, the device offers the possibility to set the value of the Frost Protection temperature and the Offset adjustment on the internal sensor.
{toc}
Where to buy the Freetime Plus Simple Daily Digital Thermostat
You can purchase the Freetime Plus Simple Daily Digital Thermostat directly on Amazon by clicking here.
Note: We earn a commission for purchases made through this link, at no extra cost to you.
Settings and Display
The Display
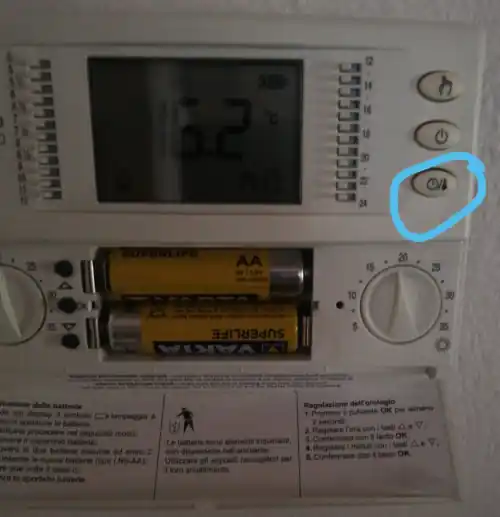
On the main screen, you can view the time or the detected temperature at the moment. Press the button with the clock and thermometer symbol (The first one at the bottom right with the battery compartment closed).
Button Functionality
The buttons on the Seitron Freetime+ thermostat are simple and intuitive:
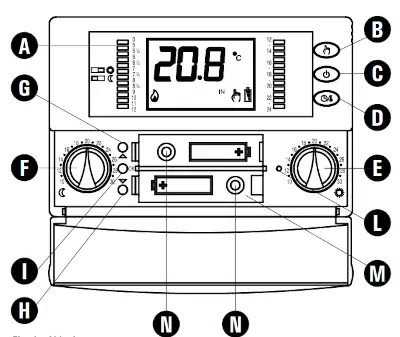
- Through the HAND button (B): Activate or deactivate the Manual function, thus enabling operation by time and temperature or only comfort temperature.
- Through the OFF button (C): Turn off the device, which will still function in frost protection mode if the boiler is in winter mode.
- Through the TIME/TEMPERATURE button (D): You can view the current time or the detected temperature on the display at this moment.
- With the small switches (A): You can choose the operating temperature between Economy and Comfort for the chosen time.
- Through the button (I): If held down for a few seconds, you can adjust the current time. Then use the up and down arrow buttons.
Set the Correct Time
To set the clock on the thermostat {field 24} {field 23}, open the lower compartment door
- Press the central OK button for about 2 seconds
- Set the hour with the up or down arrow button
- Press OK to proceed to the minute programming
- Set the minutes with the arrow buttons
- Finally, press OK to return to the main screen
Set an Operating Program
The programming is extremely simple. Once the thermostat clock is set and the on and off temperatures are set, use the small switches visible with the door closed. The legend is drawn on the left.
Each switch corresponds to an hour of the day, and the hours are indicated next to the switch (or tab). When in the right position, it corresponds to the comfort temperature (on), while if they are on the left, they go to the economy temperature (off) for the chosen time.
Finally, make sure the thermostat {field 23} is in automatic operation for the program to take effect (The hand symbol should not appear on the display).
We suggest some operating programs for the Seitron Freetime+ chronothermostat, from the most economical to the most comfortable:
Temperature Setting
Open the battery compartment door. You can set the off temperature with the left knob (MOON) and the on temperature with the right knob (SUN). Make sure the manual indicator is not on (Hand Indicator on the display). When the FREETIME+ thermostat is calling, the flame symbol appears on the display and the boiler turns on.
In this short video, we see an example of programming:
Common Issues
The thermostat does not work!
Make sure the boiler is in winter mode, the radiator temperature is correct, and the system is pressurized. Check that the batteries are charged and not rechargeable.
Verify that the detected temperature is lower than the set temperature. If the thermostat displays the time, you can see the detected temperature by pressing the Clock/thermometer button (the first at the bottom right with the door closed).
Also, make sure the thermostat is on for the current time to know which knob (Sun or Moon) to use.
My FREETIME+ chronothermostat does not start!

The summer function works the other way around, meaning you don’t need to raise the temperatures to start it; you need to lower them. This makes the chronothermostat work in cooling mode rather than heating mode. To unlock it, just press and hold the button as shown in the picture.
I changed the temperature, and it should turn on, but the flame symbol does not appear
The thermostat takes 30/40 seconds to accept the change; otherwise, it could be in cooling mode. Verify that the fan symbol does not appear on the display; if so, switch the thermostat to heating mode: Press the down arrow button for at least 4 seconds.
Frequently Asked Questions
Here are the questions and the most frequently asked ones:
How can I change the Comfort and Reduction temperature on my Seitron FREETIME+ thermostat?
The comfort or economy (reduction) temperatures can be changed through the knobs inside the lower compartment.
You can use temperatures to prioritize home comfort or to be mindful of consumption:
- For comfort (right knob, sun symbol): We suggest a temperature of about 18 degrees up to 20/21 degrees depending on your needs.
- For economy (left knob, moon symbol): We suggest a temperature of 16 degrees up to 18 degrees depending on your needs.
Why does the flame symbol not appear on the display even after changing the temperature?
The Seitron Freetime+ thermostat takes about 40 seconds to react to the temperature change. You can manually update by using the Manual button (Hand Symbol), press it twice to enter manual mode and return to automatic operation. At this point, if the detected temperature is lower than the set temperature, the flame symbol should appear. If it persists, check that it is not in cooling mode.
What should I do if my Seitron FREETIME+ thermostat does not activate?
Always check that the batteries are fully charged, disposable, and of good quality. The boiler must necessarily be in winter mode.
Otherwise, check that the temperatures are lower than what you have set.
How can I program my thermostat to operate automatically?
For automatic operation, proceed as follows:
- Use the thermostat’s switch columns to set the on and off times. Follow the guide drawn near the switches.
- Choose an economy temperature and a comfort temperature through the knobs inside the compartment.
- At this point, make sure that the HAND symbol (Manual Function) does not appear on the display; otherwise, press the HAND button to switch to AUTOMATIC mode
The display of my Seitron FREETIME+ thermostat does not light up, what can I do?
Check the battery charge.
How can I set the correct time on my Seitron FREETIME+ thermostat?
Proceed as follows:
- Open the lower compartment door
- Use the OK button and hold it for a few seconds
- The hours will flash
- Set the correct time with the arrow buttons
- Press OK to move to the minutes
- Now set the correct minutes
- Press OK to exit
My thermostat shows an incorrect temperature reading, how can I calibrate it?
The internal sensor offset is adjustable; you can correct any temperature discrepancy. A procedure is described in the manufacturer’s manual.
What does it mean when the fan symbol appears on the thermostat display?
Attention, if the fan symbol appears, it means the thermostat is set to cooling mode. If you want to switch to heating mode, follow the instructions mentioned in this article.
Useful Tips
- Frequently replace the thermostat batteries (about every 2 years)
- Do not use rechargeable batteries
- Temperatures
- For off (Reduced Temperature), a temperature of 16°C + 1°C is recommended
- For on (Comfort Temperature), a temperature of 18°C + 2°C is recommended
- If you have cast iron radiators, program at least an hour in advance for the start time. Set the economic mode accordingly to take advantage of the strong thermal inertia of cast iron.
- Conversely, aluminum radiators heat your apartment faster but do not have thermal inertia. Adjust the shutdown time accordingly.
Assembly and Installation
The regulator should be mounted in the reference room
- The unit should be mounted where it is easiest to measure average room temperature, away from solar radiation or cold sources.
- The unit should be placed away from sources of interference, for example:
- Do not mount on metal surfaces
- Do not mount near electrical cables, electrical equipment such as PCs, TVs, microwave ovens, etc.
- Do not mount the unit near metal walls or metal-based construction elements
Technical Specifications
| Feature | Details |
|---|---|
| Power Supply | 2 x 1.5V (Type AA) alkaline |
| Battery Life | >1 year |
| Backlight activation time | 20 seconds |
| Adjustment range (comfort) | 10°C .. 30°C |
| Adjustment range (reduced) | 10°C .. 30°C |
| Differential | 0.2°C (asymmetric) |
| Frost protection | 0.0°C .. 25.0°C (Default 3.0°C) |
| Offset | ± 5.0°C (Default 0.0°C) |
| Sensor type | NTC 4K7 ohm @ 25°C (Internal) |
| Accuracy | ±1.0°C |
| Resolution | 0.1°C (0.0°C .. 50.0°C), 0.2°C (-9.9°C .. -0.1°C) |
| Contact capacity | 5(1)A @ 250V~ SPDT |
| Protection grade | IP 30 |
| Insulation class | II |
| Number of manual cycles | 1,000 |
| Number of automatic cycles | 100,000 |
| Type of action | 1CU |
| Tracking index | PTI 175 |
| Pollution situation | 2 (normal) |
| Overvoltage category | II |
| Operating temperature | 0°C .. +40°C |
| Storage temperature | -10°C .. +50°C |
| Humidity limits | 20% .. 80% RH non-condensing |
| Container (Material) | Self-extinguishing ABS V0 |
| Color (Cover) | Signal white (RAL 9003) |
| Color (Base) | Anthracite gray (RAL 7016) |
| Dimensions | 133 x 87 x 32 mm (L x H x D) |
| Weight | ~ 218 gr. |
| Reference standards EMC – LVD | CEI-EN-60730-1 (2002), CEI-EN-60730-2-7 (1998), CEI-EN-60730-2-9 (1997) |


